Shenzhen Dongyi Precision Equipment Co., Ltd

Focus on stress testing solutions and equipment support

24-hour service hotline for technical consultation

400-992-8117

Technical Support

technical support

Current location:

Measurement of surface stress of strengthened glass

  • Source: Unknown
  • Date: 2021-02-27
  • Number of views:
1. Heat strengthened glass and surface stress meter
 
The use and performance of heat strengthened (also called air cooling strengthening and physical strengthening) glass with flat glass as material are relatively diversified. Therefore, its quality management has accordingly become more important. In particular, the surface stress is directly related to the strength. Glass with strength of 1000 kg/cm2 and glass with strength of hundreds of kg/cm2 have their own practical advantages. The latter is called "double strength glass" - the glass whose strength is several times greater than that of the unreinforced glass, and a new JIS was also issued. To manage the surface stress, it is necessary to use the optical phenomenon and the surface stress meter based on the photoelastic principle to detect.

 
2. Stress distribution on glass surface and photoelastic effect
 
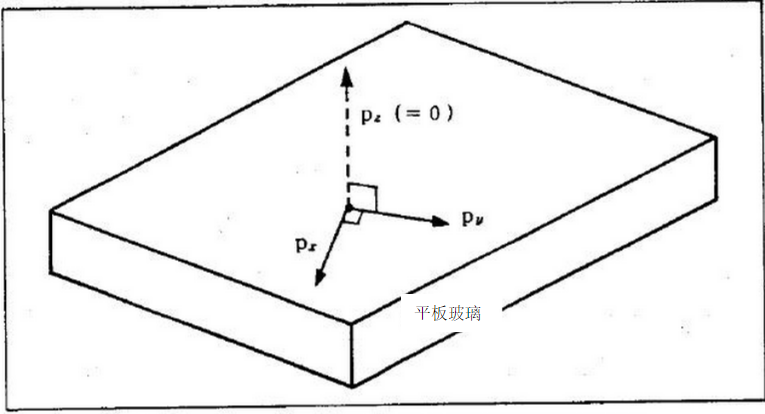
The surface of flat glass is a free surface if atmospheric pressure is ignored. The force acting at right angles to the surface is zero, so the stress is only parallel to the surface. Three principal stresses exist and are perpendicular to each other, one is perpendicular to the surface, and the strength is zero. The other two are on the glass surface (as shown in Figure 1)

 
plate glass
 
Figure 1 Angular relationship of three principal stress lines of flat glass, one of which is perpendicular to the surface and the absolute value is zero
 
Light enters the glass along the surface. If there is stress, the glass will have birefringence. One vibration wave line is perpendicular to the surface, and the other vibration wave line is parallel to the surface. Both of them have different refractive indexes. (Figure 2) The difference between the refractive index of the two is called birefringence △ n Birefringence is the difference between the stress parallel to the surface and the stress perpendicular to the surface at right angles to the path of light. But since the stress of the two is zero after, the birefringence is only proportional to the surface stress at right angles to the line of light. The proportional constant C, which determines the properties of glass according to its composition, is called the photoelastic constant. Therefore, the following formula was born: birefringence △ n=C * surface stress P formula (1) In photoelastic experiments using penetrating light, nm/cmkg/cm2 is usually used to represent the unit of photoelastic constant. It is better to read nm/cm as 10-7 when using formula (1) for conversion. For example, the photoelastic constant of flat glass is about 2. 6(nm/cm)/(kg/cm2)=2。 6 * 10-7 (kg/cm2) - 1 can also be converted into photoelastic constant with Pa and Mpa instead of kg/cm2. The refractive index uses the ratio of the speed of light in vacuum to the speed of light in glass, so the formula for photoelastic measurement with light penetration is also given, that is, optical path difference=C * stress * length of light passing through=△ n * length of light passing through

 
Fig. 2 Vibration wave A perpendicular to the surface and vibration wave B parallel to the surface of the light transmitted to the glass surface
 
3. NDT
 
The stress birefringence generated on the glass surface is detected with a refractometer, and the stress value can be obtained according to formula (1). However, the ordinary refractometer shoots light from one end of the sample (Figure 3) and uses the refraction principle of light parallel to the surface to measure. This method is not suitable for nondestructive testing of large strengthened plate glass. For devices used in optoelectronics, such as optical integrated circuits, light is generally injected into the light guide on the surface, and then light is derived from the guide. This is also a useful technique for surface stress measurement. However, the premise must be that the sample surface is light oriented.
 
4. Light conductivity of tin surface
 
Two sides and one side of the flat glass are usually coated with tin solution (also known as the bottom or lower side) in the manufacturing engineering. The Na ion in the glass and the tin ion in the solution will exchange. The concentration of tin ion will vary with the depth (Figure 4), so the refractive index will also change accordingly. The depth of tin ion entry is usually 10-30 μ m。 The high refractive index layer on the surface is the same as the optical communication fiber, which can prevent the light from diverging and allow the light to travel far (the radio wave guiding effect of light). This kind of refractive index layer can allow a lot of light to pass through, so it provides a very favorable condition for the photoelastic measurement of the surface. In order to ensure the input and output of light, a prism made of high refractive index optical glass is needed.


Professional agent of well-known instruments and equipment at home and abroad

Provide professional laboratory solutions and equipment support

  • Strong technical R&D team
  • Experienced and excellent technology and innovative ideas
  • High quality product supporting star service

Hotline:

400-992-8117

Leave us a message , please fill in the correct information so that we can contact you at the first time!

Related recommendations: